Knife Sharpening
15 Freehand Knife Sharpening Common Issues: How To Overcome Them
11.12.2016
It dawned on me recently that despite doing the very best I can in creating knife sharpening video tutorials, what happens if a problem arises when attempting to follow along. Even if I had a professional videographer following my sharpening process and the video itself was perfect, if something comes up early on that prevents the person watching from completing the process, than the video is not much use. In fact, it may create confidence issues, a novice could watch me or someone else sharpening and think it looks easy and yet not be able to duplicate what is being viewed not be able to make the knife sharp. This could be true of any video, there are some very good ones out there but in hindsight, I think I just took for granted that everyone could do it, it was just a matter of following along, if only it was that easy.
As I have always said, if it was easy, everyone could do it. Also, I want people to know that just because I may make it look easy, this is something I have been doing for almost 40 years and believe me, it was not always easy and it is still not easy. I ran into many problems and learned to overcome them, struggled and survived confidence shaking barriers because my desire to learn was unstoppable.
The purpose of this article is to help you, as much as I am able, to jump over any possible barriers that may be preventing you from reaching your goal of making your knives sharp. There are many factors that can come into play, but in some cases it is just one simple thing, that is all it will take and figuring that out and not giving up will pay off. I hope that I can help you discover a solution. If there were sharpening mistakes to make, I am sure that I made them all so perhaps I can pass along a little piece of information that will get you back on track or just make your journey even easier and ultimately, result in a sharper knife more quickly and one that will stay sharp a little longer.
[box]In this article I will discuss these freehand sharpening related issues and doubts:[/box]
[toc]
1. What Actually Happens When You Sharpen A Knife
Something that helped me later on in my sharpening life was not just gaining an understanding of what it is that is required to make a dull knife sharp but to actually force myself to visualize the process as I was doing it. It still amazes me that I was able to sharpen anything in my early days without having a base knowledge of knife sharpening, the grinding of metal and how that actually made something sharp. While it seems obvious now, it may not be for some novices but it is important to know. So how does the knife get sharp?
Quite simply, you need to take Side A and Side B of the knife and bring them together at the Apex of the blade as closely and precisely as humanly possible. This is achieved by grinding metal away in equal measures from both sides at a certain angle which when completed forms the bevels and edge. The exact angle chosen to sharpen is not as important as the ability to grind/sharpen metal consistently at your chosen sharpening angle. (I will talk about angles a little later in this article). Naturally it is important to choose a sharpening angle appropriate to the particular knife but whether you are holding it at 15 degrees per side or 17 degrees per side is not what is going to ultimately create a sharp knife, it is the holding that particular angle throughout the process that will do that. To that end, most knives are sharpened between 15 and 20 deg per side, when I say, I mean almost all. The exception are those knives able to take extremely acute angles such as 12 deg per side due the the quality of the steel their makers used.
You could make the end of a 2”X4” piece of wood sharp by just rubbing the edge against some some coarse sand paper at a 30 degree angle, flipping sides and continuing until the rectangular end changes it’s geometrical shape and becomes “V”, and eventually it can become sharp, not like a knife of course but you get the idea. We have all taken a pocket knife to a stick and whittled the end to a point.
I find it useful to “get into the zone” when sharpening a knife, as you are moving that knife edge over the stone, imagine the two sides of edge coming closer and closer together as your efforts gradually close the gap between the two sides and form the perfect primary edge that is both uniform in shape and is refined to the extent that you choose to refine.
Sharpening can be as enjoyable as you want to make it, I highly recommend that you attempt to immerse yourself into the process while it is taking place. No music, no distractions, devote your senses to the process, let the synergy develop between the physical act of drawing the knife edge over the water stones, listening, watching and taking note of the feedback that the stone has to offer. Sharpening knives is a skill that evolves into an art, you can take it there yourself, it’s just a matter or practice, patience and persistence.
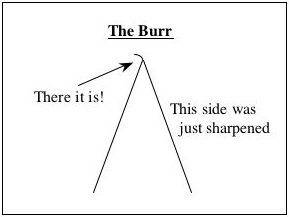
2. Raising The Burr
I have said this many times, the act of raising the burr during the early stages of sharpening a knife is a pivotal moment, it is tangible evidence that sharpness looms, what you are doing is being done correctly and your hard work is about to pay off.
Now, there are those sharpeners out there that will argue that you can sharpen a knife without raising a burr, you just stop the grinding at the exact moment before the burr forms. This is true. Please don’t concern yourself with this, and I’ll repeat what I said above, your ability to actually feel the burr form is a confidence building moment, it’s an enjoyable piece of the sharpening puzzle, why rob yourself of that? In time, with practice, you will learn to make the burr as subtle as possible, you’ll be able to feel it and know when to stop. This all comes in time but enjoy the learning process.
What if the burr doesn’t form?
Now, what happens if despite your best efforts, the burr just doesn’t seem to want to form?
a. It is not your water stones, it is not your knife. The problem is something you are not doing correctly and it is very common occurrence that you can overcome.
b. If after a few minutes on a coarse stone, 400-800 grit, you cannot feel the burr, check to make sure that you are actually reaching the edge of the edge. Use a Sharpie to paint the edge and the bevel and make sure that your actions result in the removal of that marked area. Paint the edge/bevel and adopt your sharpening angle and with very light pressure see if the mark vanishes after a couple of light passes. If it does disappear, you are on target, your angle is correct and you can continue. If it is not removing the mark, you simply have to adjust the angle by raising the spine of the knife from the stone, or lowering it. Do this in very small increments, remember that your sharpening angle for the typical, average chef knife is 20 degrees per side, so you want to keep within that range and it is often just a tiny adjustment that is required. Patience is tested at this stage, after decades, patience is still tested at this stage so don’t think this is something that is seriously wrong. ALSO, note that you may be at the perfect angle to reach the edge of the edge but it could be something else, the steel could be causing the problem……persistence and focus will see you through this.
c. If you are successfully removing the Sharpie mark but still not raising a burr, check your pressure. Are you using enough pressure to get the job done. When I sharpen, my technique enables me to use my fingers to apply pressure directly to the edge and that is where the sharpening takes place. When starting with a dull knife, it is you and the stone doing the work, not just the stone itself, you need to help it by applying the appropriate amount of pressure. I use four levels of pressure and at this stage, it is at level P4…the most amount of pressure that I will ever use on one knife.
d. You need to grind evenly on both sides so after a few minutes with no burr, flip the knife over, even if you have not formed the burr, flip it and paint the edge/bevel and start the process on the other side. This will ensure that you are removing metal from both sides of the knife evenly. Eventually, with this approach and with patience, the burr will form, you need to feel for it. It is common for it to form in one spot, the middle area of the edge for example, you need to continue until you can feel it from heel to tip. Then you can flip the blade and repeat the process until the burr has been raised on both sides of the knife. Once this is done, pressure should be eased off, your objective has changed from burr formation to burr removal and from this point on, that is all it is about, there is no need to form additional burrs. You will get the hang of adjusting pressure in relation to burr formation. In other words, when I am creating a burr and using P4 pressure, if the burr is formed on a portion of the edge, and remember, the burr always forms on the opposite side of your sharpening, but if I have successfully formed a partial burr, I reduce pressure when I get to that area where the burr has already formed and increase it as I move along so that eventually, the burr is formed from heel to tip. This can take anywhere from two to ten minutes or even more depending on the knife itself, the stone being used and your skill.
e. Remember that Burr formation is crucial to creating a sharp knife, don’t give in to the urge to move to a finer grit stone until this work is done, the 2,000 grit stone is not going to make your knife sharper unless it is already sharp before you use it. Also, don’t raise the angle to achieve the burr more quickly, once you chosen an angle, sharpen the knife through to completion at that angle. The coarse stone has the ability, with your involvement of course, to make a knife very very sharp, the sharper you can get it on the coarse stone, the better, and, the easier it will be to refine the edge.
f. Do the checks:
- Adjust your angle until you are successfully reaching the edge of the edge, remove the sharpie and concentrate on consistency.
- Flip the knife to ensure an even grind, keep the stone lubricated and monitor your work, feel for a burr often and stop grinding when it is there.
- if you are using one stone to sharpen, remember that burr formation on a1,000 grit stone will take longer than on a 320 grit stone.
g. Move to the next stone once the burr has formed on both sides and it is removed on both sides, create a nice clean and sharp edge, reduce pressure significantly and complete your coarse stone refinement by varying your pressure.
3. My Water Stones Are The Problem
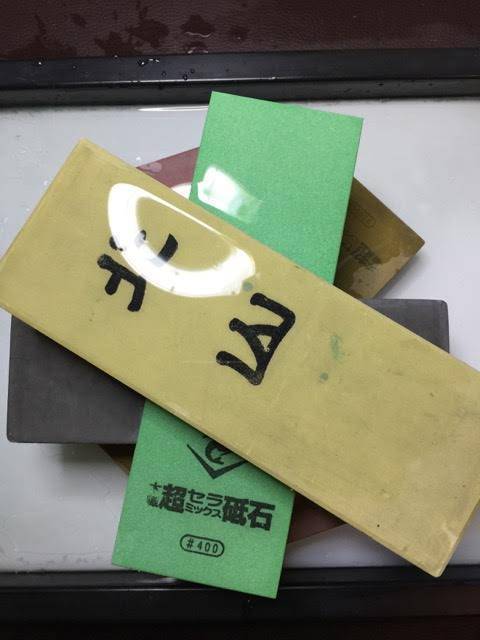
One of the problems with watching videos is that you may feel the need to use the same brand of water stones as your favourite YouTube sharpener uses. I have rarely used a water stone that I didn’t think could do the work. The only whetstones that I have tried and threw away were the inexpensive, no name, no grit identification and usually lubricated with oil. I am talkiing about the $8.00 stones at the hardware store. If you are using a commonly known brand of stones like Shapton, Naniwa or Gesshin, just for example, your water stones are not going to hinder your progress. It is important to trust the stones you use but before you decide that they are the issue, make sure you have followed all the basic steps first. My father, and his father made chisels and other edged tools extremely sharp on old oil stones that I would not even think to use now, so believe me when I say that the stones are very likely good enough. Grit choice is more important than brand choice, Coarse, Medium and Fine in the wide variety of stones available is a great choice. Also note that just because a company makes a good knife it doesn’t necessarily make a good water stone, just putting that out there. Stick with the common brands, I did and have never regretted it. If you are using an oilstone, that’s fine, again, same thing, make sure it is a good one, not something picked up at a yard sale for $2.00. There is a multitude of excellent whetstones available, here are my favorite sharpening stones.
4. Learning To Sharpen On A Very Cheap Knife
This is a very bad idea, the steel in very inexpensive knives are not conducive to hand sharpening, they are difficult to sharpen and will break down your confidence levels and have a negative impact on your ability to sharpen a knife. Believe me, I sharpen thousands of knives every year and these are the knives I don’t look forward to taking on. This is not to imply that you should be learning on your handmade Fujiwara or Masakage, you can, but all I am suggesting is that you start with a decent knife, start with one of the ones you use every day. If you are worried about scratching the blade, tape it up with painters tape and just leave the edge exposed. People like the ones reading this article, people like you are smart, eager to learn and you are not going to do something that will harm the knife. Even in my very early years of sharpening, I never damaged a knife from poor sharpening habits.
5. Steel: Different Types, Different Approaches

If you are reading this, it means you are interested in sharpening and very likely in knives so you know that there are knives made from steel in The Good, The Bad and The Ugly range. The ugly range comprises of the very cheap knives I mentioned in the paragraph above, we have all seen and used them. Just because I don’t recommend learning to sharpen on one doesn’t mean you will not have sharpen one someday. I like to keep things simple, you don’t need to have an in depth understanding of metallurgy to be able to approach your sharpening appropriately when handing a lot of different knives. There are a couple of important things to take into account if you do have to sharpen “soft” knives and “hard” knives. Let’s assume the hard knives start at 59-62 and soft knives are at the 54-58 range. Angles and finishing grits are the two things to consider, your choices will have an impact on the knife itself, the cutting performance and edge retention.
If you are fortunate enough to own a Takamura made of R2 powdered steel for example, you should at least know that this knife is going to react differently to your water stones than your $40.00 Chinese made every day chef knife. The steel is very hard, it’s absolutely fantastic knife steel but it is hard and you will definitely feel the difference as you go burr hunting.
The terms White Steel and Blue Steel have nothing to do with the colour of the steel, the colours come from colour of the paper used to designate which steel is which. It is important to understand that different steels mean different sharpening angles and can impact the degree of difficulty in sharpening. I personally find that the better quality of the steel, the easier it is to sharpen. Burr formation on White Steel (Shirogami), one of absolute best steels used to make knives, can take longer so patience will be tested. I find that the quality of the synthetic water stones however, and their ability to cut through the steel reduces the burr forming time and potential difficulty. Shapton Glass stones for example excel on hard knives.
Basically, just know that some knives can be sharpened and should be sharpened at more acute angles than others. For example, I can sharpen a Fujiwara at 20 degrees per side, the knife will be blazing sharp but by sharpening the knife at this angle, it is going to have a negative impact on it’s performance. Knives like this should be sharpened at about 12 degrees per side to unleash the incredible slicing capabilityies the knife has to offer. Conversely, if I sharpened a softer knife, a Henckels with a hardness of 56 at 12 degrees, again, the knife would be exceptionally sharp but edge retention would be effected as the steel is not able to hold up to normal pressures and stresses it would face in the kitchen.
Over time, this will all come pretty natural and be common sense to you, it is not much to worry about, just know that different knives should be sharpened at different angles. The safe approach is to try to match the factory angle or the angle placed on it by the person who first sharpened it when it was new.
How steel influences the sharpening angle
If your sharpening an average, softer knife, these are the most common, the stainless ones, your sharpening angle should be 20 deg per side, or as close to that as you can manage. This is a very common angle as it is obtuse enough to support the softer steel and that angle will stand up relatively well under normal kitchen duty. You can sharpen a soft knife at any angle by the way, you could sharpen it at 10 deg per side if you want, but you need to know that edge retention will suffer dramatically as that angle is just to acute for the steel, it will not stand up to normal use, it will feel extremely sharp but just for a short while. So the 20 deg per side angle is going to give the edge the support it needs to last a little longer, don’t expect miracles of course but that is idea. If you have a Takamura it would be an absolute shame to sharpen it at 20 deg per side, yes of course it can be very sharp but you would be degrading the performance of the knife using it at that wide of an angle. Harder knives such as this, knives in the 62-64 range can support a 12 deg per side angle. For now, just know that not all knives should be sharpened at the same angle, if all your knives are average knives, the ones we all use than you can sharpen them all at the same angle, build your muscle memory at the 19-21 deg angle and keep them that way. Angles impact not only edge retention but performance, the Takamura and Fujiwara for example can support the more acute angles due to the quality of the steel used to create them. Last the end of the day, you will find that almost all knives fall into the 15-20 degrees per side range.
How steel influences the choice of stone grit
Typically, I will sharpen a knife using three water stones, 500, 1,000 and 5,000 grit for example or I may use a 3,000 grit stone in lieu of the 5,000. When I get to the finishing stone, whatever that may be, I am not grinding, in fact when I move beyond the coarse stone I am no longer grinding, I am refining and I am using very light pressure. If I am working on the typical $100.00 Henckels for example with a hardness of 56-58, this is my normal setup. Remember however, the knife is sharp before I even touch the 1,000 grit stone.
If I am sharpening a harder knife such as a Fujiwara with a hardness of 64, my process is the same but I may finish it at 8,000 so I would use four stones but again, at the 8k level that refining pressure is very light, just enough to keep the blade stable as I move it gently over the stone.
There has always been some talk about finishing a Euro knife at 1,000 grit, “that is all that is required”. After years of researching this, i.e. why would people say this? I discovered, from a fellow sharpener with a vast amount of knowledge that it has to do with edge retention and finer refinement reducing the width of the secondary bevel and ultimately the Apex of the knife being weaker. It took me years do find this out and now that I have, I’m satisfied but ultimately, it does not really have an impact on the way I sharpen a knife. Sharp is sharp, there are so many factors that influence edge retention that I just strive to make the knife as sharp as I possibly can and sharpen at an angle appropriate for the knife.
6. Tip sharpening tip
For many, the sharpening of the tip of a knife introduces a different challenge, it just seems like there is no way to get it sharp. There is an easy solution:
When you are sharpening and approaching the tip area, an inch (25 mm) all you need to do is raise your elbow up so that is parallel to the floor, it feels a little awkward but it works. If you continue to sharpen the knife, including the tip the same way, it won’t take long until you notice the bevel becoming wider in that TSZ (Tip Sharpening Zone), that simple movement of raising the elbow solves the issue. When you are doing the left side of the knife, you raise the tip and tuck your elbow into your body. If you are left handed, you will do the opposite but you are still raising your elbow. As soon as you start heading back down the blade in your sharpening, as you exit the TSZ, lower your elbow. When you get comfortable with this you can try to move the tip area over the stone in a motion that follows the contour of the blade, like you trying to draw a little arc with the tip on the stone. However, be very careful, you can dig the tip into the stone so just use very little pressure. The motion of raising your elbow will help alleviate any “bevel creep” into the tip area.
7. Angle Hunting and Catching
A common fear among novice sharpeners is the perception that unless an exact angle is met, the factory angle for example, not only will the knife not get sharp but it can be ruined. I know people who have let this interfere with their desire to learn to sharpen knives by freehand.
Now, the ability to hold the knife at a chosen angle consistently while sharpening is indeed a challenge, it is completely normal to be a little inconsistent at first, this is something new your muscles need to learn. I can promise you though that with practice, you will overcome this inconsistency and you’ll be amazed how precisely you can actually hold that angle.
Guided devices such as the Edge Pro and Wicked Edge Precision Sharpener eliminate this problem by forcing the user to sharpen at an angle they locked in on the device. However, we don’t have one of those so freehand sharpening it is:
I recommend learning to sharpen knives with two different angles for two different types of knife. The first one is 20 degrees per side, you need to find out what a 20 deg angle looks like and you see this as you raise and lower the spine of the knife off of the stone. A 20 deg angle is suitable for most average kitchen knives. Your goal should be to determine how how you need to hold the spine off of the stone to achieve this angle, or any angle you choose to sharpen at.

The exact angle is not as important as your ability to sharpen at the chosen angle throughout the entire process, i.e. attain consistency. So whether the actual angle is 18 deg, 19 deg or 22 deg, you want to keep that angle from start to finish. If you do want to find out exactly what a 20 deg angle looks like, i.e. there is mathematical formula available. You can also use an Angle Finding App on a Smartphone to provide a visual reference for you to go by, to get started. The problem you will encounter is that once you have found the angle. i.e. by holding the spine of the blade at one half of an inch off of the stone, the challenge commences as soon as you start the sharpening.
Do not worry about the angle, i.e. the digit, as long as you know that most kitchen knives are sharpened at 15-20 deg per side. Now, Shun knives come from the factory with 16 deg angles, Globals can be sharpened from 10-15 deg per side.
The steps to catch an angle are as follows:
a. Determine the most appropriate angle your knife should be sharpened at, it is easy to find the factory angle by doing a search on the web. You can of course choose your own angle, you can decide to sharpen all your Henckels at 15 deg per side, it’s your knife/knives. Remember, the exact digit is not as important as learning to HOLD that angle while you sharpen.
b. Hold the angle at the appropriate angle, this can be achieved in a number of ways and it doesn’t have to be complicated. If you have used a formula to learn that if you hold the knife spine .5 inches off of the stone it creates a 15 deg angle for example you can
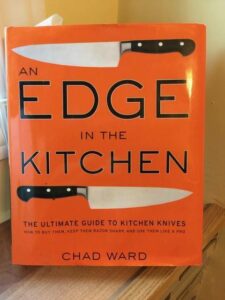
start there. Using Sine, an angle of 15 deg per side requires you to raise the spine of the knife half an inch off of the stone if the width of the blade at heel is two inches. This is all explained beautifully by Mr. Ward in his book An Edge in the Kitchen. You
could then create a little visual guide in the form a stack of quarters or cutting a wine cork at .5 inches and use that to rest the spine of your knife on. The problem with this is that the guide you create, whether it is the quarters or cork does not move with you so it is visual clue only, once you start sharpening you are on your own of course. The easiest way and perhaps the best way is to simply paint the edge and bevels (if they exist of course, sometimes there seems to be not bevels) with a Sharpie and hold the knife at an angle that results in the removal of the sharpie as you sharpen the knife. The beauty of this is that you can repaint the edge as much as you want to. At this angle hunting stage, use very light pressure, you are just trying to determine the best to hold the knife. You can also just eyeball it, you know want 90 deg looks like, keep halving that until you get close to 20 deg and that will place you within range.
c. Whatever angle you are holding the knife at, work at holding the knife at that angle during the entire process, and on both sides, remember, it if this was easy everyone would do it, it takes time and effort on your part to attain consistency.
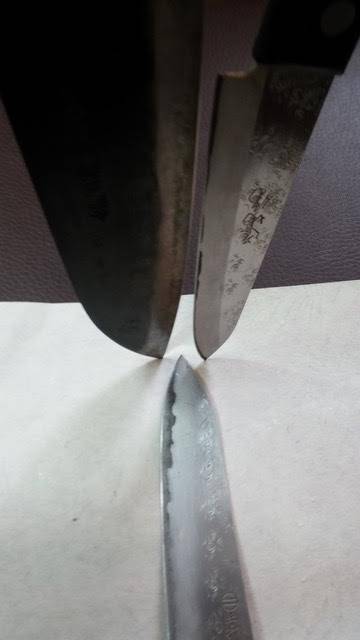
8. Closing the Gap and Signs to Look For
What I mean by closing the gap is this, first of all there is no gap, it is just a phrase. What it means is that you’re bring Side A and B of the knife together at the Apex of the knife to make it sharp, the angle you hold the knife at will determine the width of the bevels, if you sharpened it at 35 deg per side for example and held the knife with the edge pointing upwards, the edge would resemble the edge of an axe more than a kitchen knife. Sharpen at a more acute angle, 20 deg or 15 deg per side and of course that edge looks like a kitchen knife edge, nice and thin and easy to work with.
When I sharpen, I always have nice strong light source and I am constantly checking my work by looking at the edge of the knife holding it at 90 deg so I am looking down right at the edge itself, not the bevels. Sometimes I can see little glints of light along the edge and this is just what I am looking for. The light is reflecting off of the metal that has yet to reach the Apex of the knife, in other words, to put it simply, I just have to do a little more grinding on the areas where there is any light. So I do just that and light pressure until the light vanishes, you will feel the knife increase in sharpness as you progress with this little trick. I do it often, sometimes there is no light, sometimes there may be just one area with a few glints of light, so it is just a matter of working until it is all gone and you don’t see anything but the edge. Try it, it is very useful. That is what I mean by closing the gap, it is an act of precision when you can bring the two sides of the knife together at the Apex and create a very very thin line of steel, your primary edge, the cutting edge. Sharpness increases as your ability to do this along the entire edge increases. I often do a little bit of fine tuning at this stage, when I think that I have completed the job, I will just very very lightly pass the edge over the finishing stone at such a light angle that the knife is almost falling out of my hand.
9. Minor Edge Repair
While this paragraph isn’t about sharpening it is something that can make you a better sharpener, why? Chips happen, little nicks in the edge of knives, especially harder knives and your ability to remove these will increase your confidence levels, expand your sharpening portfolio and thus, make you a better sharpener.
There are a couple of ways to approach minor chip repair using a coarse water stone, there are many ways to repair damaged knives using powered tools but this is about your water stone.
If the chip is very minor, i.e. you have to look carefully to see it, sharpen the knife as if the chip was not there, it will vanish during the sharpening process.
If the chip is a little more significant and clearly visible this is what I do: Using a coarse stone, 220 to 500 grit I hold the knife at almost 90 deg, more like 85 deg and using medium pressure I begin to grind the metal along the primary edge, I am sharpening but I am holding the knife basically as if I was using a chopping motion. My goal is to remove metal along the edge until that chip disappears, so I am constantly checking to make sure that I don’t overgrind here. I don’t want to remove more metal than I have to. Once I see the size of the chip decreasing I start lowering my angle until I am at the normal sharpening angle. Now I have a little work cut out for me as my previous actions made the knife dull. However, the chip is gone because I got to the bottom of the hole basically, now it is just a matter of re-sharpening the knife using my normal process. Edge repairs like this will vary in the time it takes depending on the steel, the stone and your skill. It is very doable though, you don’t need to put up with chips in your blade.
10. Keeping Your Water Stones Flat
Your water stones will dish in the middle with use and the coarse stones will dish more rapidly. There is number of ways to keep them flat but it is important in my opinion to do so and easier to do if you do it often, maintain flatness to promote bevel consistency and besides, it just looks and feels much better. Nothing looks worse to me than a water stone that is clearly dished in the middle, it is sign of neglect, so stay on top of it. I personally use the Atoma 140 diamond plate but there are plenty of options out there, Stone Fixers, wet/dry 320 grit sandpaper, drywall mesh is one that I have heard of.

I start my sharpening day by flattening my stone before I sharpen my first knife, I make sure it is flat by drawing a grid on the surface with a pencil and then using the Atoma to remove the grid lines. I do this about every three knives and I do it with every stone. You don’t have to use a lot of pressure, it doesn’t take long if you do it regularly. You will find that your finishing stones will not dish nearly as quickly as the lower grit stones.
While this is not really something that is going to help a novice sharpener overcome a sharpening issue, it is all part a sharpeners life, an important one.
11. Pressure- The Big One
Learning that pressure variances while you sharpen can influence your results was a pivotal moment for me in my pursuit of sharpening perfection. (Something I hope to pursue until I am too old). When I sharpen a knife I use a four tiered pressure system and it has done wonders for me. There was a time when I wondered when to switch from my coarse stone to another stone and so on. When do we stop?
The formation of the burr on both sides was the signal I was looking for at first, this was the moment I knew it was time to move on. Then that all changed after a chance, life changing encounter with a master knife sharpener. I learned, from trial and error that if instead of moving to another stone I just adjusted my pressure than it seemed like the knives were getting sharper and eventually, over a period of a couple of years I put in place my four waves of pressure that is pretty simple and there is a video I made of it as well.
I pick up the dull knife and with my coarse water stone, usually 400 or 500 grit, I use the maximum amount of pressure required to raise a burr. I call it P4 pressure, (Pressure level 4 in a pressure system of 1-5 where 5 is never used and 4 is the heaviest). At this stage I am pressing down with my fingers along the area close to the edge, doing the finger dance and it is me and the stone working together. The amount of pressure is enough to do the job but not too much that it is uncomfortable or over the top. I am not trying to embed the knife into the stone, you will use your common sense here.
Now this is important: Heavy pressure on a coarse stone equals metal removal, your goal is to remove metal, the bad stuff, NOT the good, untouched metal lying beneath the fatigued metal. So you use P4 pressure and constantly check for the burr and as soon as you can feel it you ease off and repeat for the other side. As soon as you have reached your goal of forming the burr on both sides, ease of completely and you will never use P4 pressure again on this knife. It is a one time thing, it is burr forming pressure only. Until you get the hang of it, just use medium pressure and get used to the motion of using pressure with your fingers riding along the perimeter of the edge, as close to it as you can without your finger pads touching the stone.
If the knife is not that dull but just needs some honing, do not use P4 pressure, go lightly on a finer stone. (Remember, this is sharpening and we sharpen dull knives, we hone knives that are not dull until the honing process becomes ineffective).
After the burr is formed, this is where I changed things up and it is the moment I personally achieved my sharpest knives. Instead of switching to a 1,000 or 2,000 grit stone I continued on the first stone but I eased up to P3 pressure, a fifty percent reduction in pressure. The process at this stage moves along quickly, I am coarse stone refining now and I DO NOT want to form another burr, I’m just cleaning the edge carefully here and I’m being very vigilant, I don’t want to take off more metal than I need to. I then go to P2, another reduction to the point where I am barely using any pressure at all. Finally the P1 moment is a stropping motion on the stone, my fingers don’t move along the perimeter of the edge to press down, it is Trailing Strokes only and an extremely light amount of pressure is in place.
Now I can move to the finer stones and I will never use P4 pressure again, I will start with P3 and move down to P1 with every stone henceforth. I am very frequently checking the edge to feel for sharpness until my standard is reached.
We should never just grind away heedlessly, that metal we remove is gone forever, a fond farewell to the fatigued metal that we are sending off to Fatigued Metal Happy Land but once we expose the fresh metal, we need to treat it with respect, we are gently massaging it into shape at the Apex, not using brute force to get it there, just coaxing it along gently to its rightful place.
Pressure manipulation is something that you can try or not try, I am just describing what has worked for me, and for many many others by the way.
12. Discover Your Sharpening Technique
I changed up my technique about three times in total until I settled on the one that I use now, permanently. It is understandable to check out differently styles, some of the ones you will see on YouTube or perhaps what you were taught. I found that once I finally locked myself in to my technique that I was happier, this was one more element of the entire process that I did not have to think about anymore. Almost all hand sharpeners stand, it is easier to move your shoulders and arms and gauge your pressure in the standing position so unless you can’t stand, stand and sharpen. Work at height that does not leave you bent over, there should be no distractions and a bad back is a good source of interference. Have a good lighting system over head, it really helps a lot.
Some sharpeners use a sweeping motion, that is fine if it works for you, I am not here to criticize other peoples methods, I am just suggesting that you decide one, stick with it, make it yours.
I first started using a sectional form of sharpening, I would hold the blade so that I could do the heel, centre and tip area so I was sharpening in three sections but I found it very difficult to have nice and even, consistent bevels. That all changed when I switched to the the one I use now, which I believe is a very common technique and easily picked up.
Another decision to make was Edge Leading or Edge Trailing, I have used both and both worked. However, I did find that Edge Trailing, i.e. as you sharpen the edge is facing you and you are applying pressure as you push the knife away and releasing pressure as you bring it back, that is the way I really love to sharpen.
The whole point of this paragraph is to encourage you to find a technique that number one, makes the knife sharp but is also something you can adopt quickly and remain comfortable for however long you plan to sharpen. I have stood at my sharpening station for eight hours, so you need to love your setup, I mean really love it, make it your own.
13. Toothy vs Polished Edge
This is perhaps one of the most talked about sharpening topics that exist, this is one that left me confused for sometime, something I fretted about because at first I didn’t understand what the big deal was. Again Mr. Chad Ward does an absolutely fantastic job discussing this, it is brilliant and I strongly recommend reading his book, I have several times.
By teeth we are referring to the level of refinement on the edge of the knife, the depth of the parallel scratches created by the abrasives in the coarser water stones. If you look at your edge and bevel with a Loupe during sharpening, and you should, you can clearly see, even at 10-15 time magnification a difference in the scratch patterns created by different stones.
My understanding, and remember I didn’t I did attend knife sharpening college so I may be corrected by someone here. However, to me, the difference in edges, toothy or polished impact two things, the way the knife cuts and edge retention.
I have some videos where folks, in an attempt to prove that a highly polished edge is unable to bite into a tomato because the teeth (scratches) do not exist. So the edge will just ride over the tough skin of a tomato and will not penetrate unless a fair amount of pressure is used. The knife is “riding” the tomato in these videos.
I have since proven that this is not a case of the edge being to smooth to slice the tomato, it is case of the knife not being sharpened as precisely as it can. Further more, I have tested and retested many many times with success that a beautifully polished edge will indeed bite into a tomato. Also, I have had many hand made knives sent to me, these are the knives sharpened by the Sharpening Lords in Japan. Each of them has had a polished edge and a tomato was no match for any of these.
I found that when I was learning, and pretty good at what I was doing, I was unable to pass the tomato test every time at refinement levels exceeding 6,000 grit. Below that, with a more toothy edge, there was not problem. However, as my level of consistency developed, as the sides of the knife came together at the Apex more precisely, I was able to make the knife, any knife, pass the test, even at 10,000 grit.
What’s the bottom line: Use the stones you have to sharpen the knife and don’t be overly concerned about this. Sharpen a $100.00 Henckels up to 1,000 grit and see how it cuts for you, then try it at 5,000 grit. Remember, after the initial sharpening with the coarse stone, pressure decreases so by the time you get to 5, 000 grit you should be using refinement pressure only, nothing to heavy.
There are other factors that will influence how YOUR edge will perform, the steel the knife is made of, the product being sliced, vegetables or protein or both. Don’t get too hung up on this and feel have to fine tune your refinement levels for every different type of food you cut.
Now what about edge retention? In the very awesome book, An Edge in The Kitchen by Chad Ward he describes the goodness of a polished edge and recommends it in every case. He provides scientific support to his belief that polished edge will last longer than a toothy edge. A toothy is more conducive to knives that cut rope for example while for kitchen use, a polished edge is the way to go. Now I had to read the paragraph over a few times to understand it but is quite convincing. On the other hand, I have spoken to professional sharpeners who are not quite convinced. I am not on the fence here, I believe in a polished edge, it just makes sense.
I believe, and this is just Peter Nowlan’s (me) belief, that there are so many factors that influence edge retention that whether a polished or toothy edge enhances it, they are but parts of a bigger puzzle, parts that we can’t always control. We can’t change the steel in our knife, we cannot make a butternut squash easier on the edge of knife, all we can do is learn what the different variables are and then learn how to deal with them.
I have sharpened a thousand knives at 400, 1000 and 5,000 grit, I just don’t see a problem with it, regardless of what I am slicing. I do encourage you to experiment and make the best of the stones that you have. You may have a 3,000 grit stone as your finishing stone, that is perfectly fine. I think we have a tendency to over-refine anyway, does any knife need a 10,000 grit edge, no it does not, it doesn’t need it to be sharp but if you have one, try it out and make it work for you.
14. Expectation Management
I recall a time I felt compelled to prove my worth by performing slicing miracles, slicing a tomato horizontally without holding the tomato, or a grape. I no longer feel that way at all and in fact, I’m pretty tired of them, I skip over any that I see. It is indeed evidence of the skill of a sharpener and clearly the knives are sharp. My problem with them is that for a novice who becomes captivated by these, they can be misleading and lead to false expectations. I am telling you that you don’t do be able to do this to have sharp knives, these are not stepping stones that appear in your near future. These are the things that you can do when you’ve achieved your goals, you’re knives are sharper every time that you ever thought possible.
Manage your expectations, just try to make the knife a little sharper than it was when you started. Check you edge and bevels for consistency, nice and even lines from heel to tip on both sides. Pass your own sharpness test every time, whether it is slicing telephone book paper or arm hair or slicing into a pepper, these are the miracles you need to strive for. After that, then you can cut a balloon while dangling from a rope with the knife in your teeth, go for it, but only after the really important goals have been achieved, repeatedly.
15. Videos, Videos, And More Videos
I could teach my wife the basics of sharpening a knife in 20 minutes, she could then create a video on YouTube and you may think she knows what she is talking about. There are so many sharpening videos out there that it is almost impossible to keep track of them. Some are really good but many are not, not good at all and can lead set you up for failure if you take them seriously. Select a video produced by a competent sharpener and learn from it. You can email me here for a list of my favorites. Here is a video of me sharpening a knife from dull to sharp.
Find one and stick with it but don’t watch too many, get the basics down if you need to and then get to work on your own. Eventually you’ll be making your own videos.
Conclusion
To summarize, sharpening knives by hand on Japanese Water Stone is a wonderful skill to learn, a skill that can become an art, one that can grow with you. You don’t need to be a master to make your knives sharp. I teach sharpening and wishing two hours, complete novices, people that have never seen a water stone are achieving very acceptable levels of sharpness. Enough to know that their days of working with dull knives have come to an end. You can do this as well, just keep in mind it is very very long and enjoyable learning process, one that doesn’t have to end but with just a little effort and time, one that can leave you extremely satisfied with yourself. Read some good books, An Edge in the Kitchen and Fine Japanese Kitchen Knives, these will not only aid you in your drive to understand knife sharpen but they are fun to read, they are enlightening.
As my friend Mark from Chef Knives to Go says, Stay Sharp!