Food and Recipes
Our Kyoto Correspondent: By Way of Introduction
30.08.2015

One of the chiefs of this site very kindly asked me to contribute, so I’d better begin with an introduction. It’s only fair. My kids had to introduce themselves before their entire school, and they had to do it in Japanese, which isn’t their (or my) native tongue. So here goes.
Back in 2008, I moved to Kyoto for a sabbatical year while my wife taught at the University. I wrote a very occasional blog (restarting soon) and got into the whole knife thing. I got hooked on the late, lamented “Fred’s Cutlery Forum” as well as “ChefTalk,” the latter going strong, and spent a lot of time learning about Japanese knives—their history, production, uses, sharpening, and so forth. I’m no master of any of these things, but I have found that my knowledge and my academically-honed analytical skills have allowed me to be passably helpful to others. If you’ve read my ChefTalk article on “Japanese Knives 101”, you know my take on the basics.
In the last few days, I’ve moved back to Kyoto, this time for four months. Coincidentally, I was asked to contribute to this site. And this leaves me, oddly perhaps, in a quandary.

I am not a sharpening master, though I do okay. I haven’t used most of the knives you’ve heard about on this or any other site. I am not a professional cook, nor have I got the knife chops to lay claim to parity. I have never bought a knife on any online site, from Amazon to Korin, except by dint of having a Japanese bank account and a lot of Japanese-fluent helpers.
What can I hope to contribute?
Well, one thing I’ve noticed, on this site and others, is that everything is about the knives, and little about what to do with them. Buying, sharpening, comparing, maintaining… but not a lot of cutting. This seems strange to me, because I don’t quite grasp why you’d want to collect fancy knives you don’t use. If that works for you, great! But I use all my knives regularly, apart from two junkers I bought in Japan and haven’t gotten around to selling.
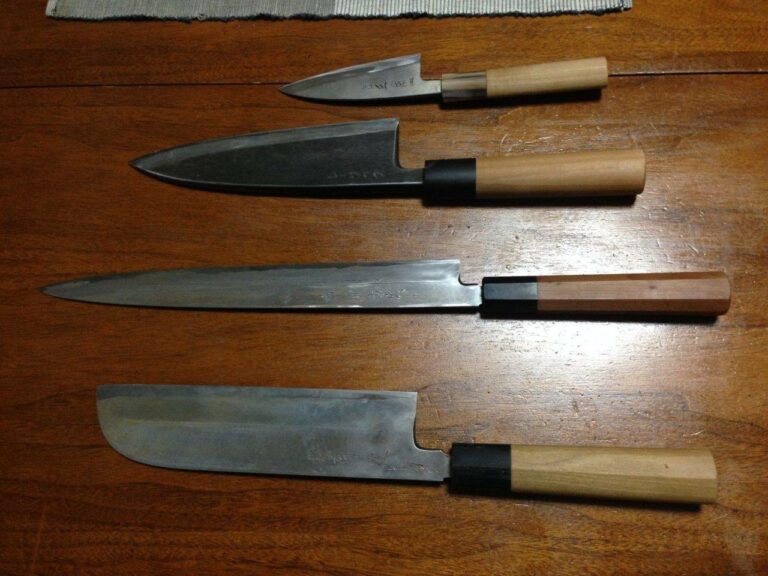
In preparation for returning to Kyoto, I had to decide which knives to take. Not the whole shebang: I didn’t want to pay shipping, so they got packed, in bubble wrap and such, inside a hard-sided suitcase. I decided to go pure J, as it were: I have a yanagiba, a big and a small deba, and a kamagata usuba (I go Kyoto-style, which means kamagata usuba and yanagiba instead of square-tipped usuba and takohiki). No gyuto, no petty. No cheating.
This immediately raises a question: what the heck do you do with these things if you’re not a professional Japanese chef? Good darn question. My skills are passable but no more.
First thing I learned: a crap cutting board will eat your usuba. I knew that, actually, but had forgotten.
CUTTING TECHNIQUES AND RECIPES
Assuming you’re not planning to move to Japan with a traditional set any time soon, though, this is all by the way. How about this: what can you do with traditional Japanese cutting techniques?
Well, let me tell you about dinner tonight. Or anyway, two dishes: toriniku barei-age and sawara à la Jacques Pépin.
For the first, you shave potatoes into long strips, using the katsura-muki technique, roll around raw, seasoned chicken, and deep-fry until golden and crisp. For the second, you take thin slices of Japanese Spanish mackerel (sawara) and quick-cure them on a plate, then decorate with flavorful garnishes. You can make these with any knives, but single-beveled blades like the usuba and the yanagiba do it best by a large margin. Everything depends on cutting technique: katsura-muki in the first case, and draw-slicing in the second.
TECHNIQUE #1: KATSURA-MUKI (桂剥き)

Katsura is the Japanese Judas-tree, or cinnamon tree. Muki means peel or peeling. I suspect that the name comes from the way Katsura bark peels, but I could well be wrong.
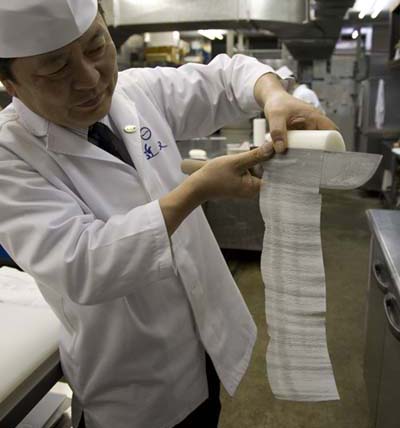
This is the technique you’ve probably seen on YouTube or elsewhere, used with daikon radish. The cook carefully and steadily peels all the way around the cylinder of radish to make a long, translucent sheet. This can then be sliced into hair-fine julienne, among other things to make a mound against which to balance a little pile of raw fish slices. (Tokyo-style barbarians call this sashimi, but here in Kyoto it’s otsukuri お作り.)
Although most commonly done with daikon, katsura-muki can be done with lots of other things, notably ginger, zucchini, lotus root, carrot, cucumber, and any kind of potato. The harder the vegetable, the trickier the technique.
The core difficulty with katsura-muki, as I see it, is that it is tricky to learn, and nearly pointless for most people who own a vegetable peeler. If you’re just trying to strip the rind off a carrot, why stand there with an usuba? And why would you want translucent sheets of any of these vegetables? If you’re serving sushi or sashimi for a living, you need to do this, but otherwise, why bother learning?
Questions like this have for years kept me from actively pursuing mastery of this technique, but now I’ve decided that, come what may, I’m going to learn it while I’m here in Kyoto. So, for a first time out, I decided to make toriniku barei-age.
Tori: chicken. Niku: meat. Barei: horse bells. Age: fry.
When potatoes were introduced to Japan, they were little balls that people thought looked vaguely like the bells put on draft-horse harnesses, so one old name for them is barei. Thus the dish is a chicken-and-potato fry. But it’s so much cooler than that.
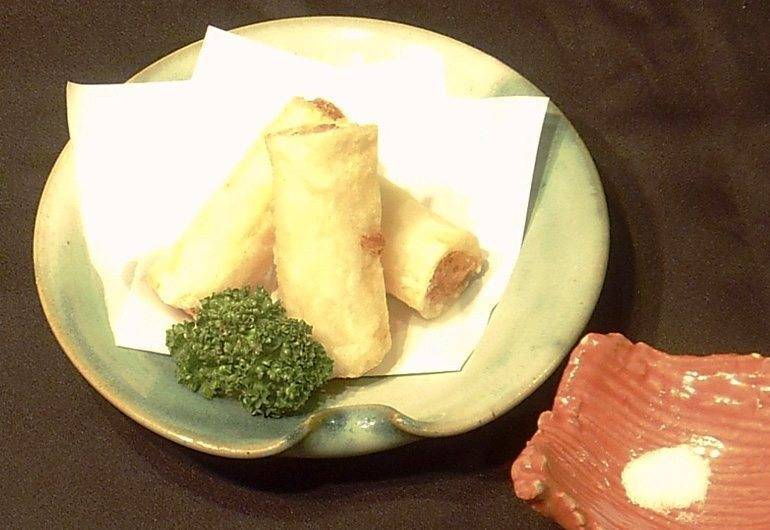
RECIPE: TORINIKU BAREI-AGE (鶏肉馬鈴揚げ)

- Using the katsura-muki technique, peel a few large, oblong potatoes into cylinders, discarding the removed portions of skin, then peel into long, translucent scrolls. Roll up the scrolls and immerse in cold water for a while. Ideally, leave water running into the bowl very slowly for about 5 minutes, to remove as much starch as possible.
- Cut some chicken meat—preferably thigh, with or without skin as you prefer—into fat strips about as long as the potato strips are wide. This will of course depend on the strip and the potato. Season with salt and a little pepper.
- Unroll 2–3 inches of potato on a paper towel-lined surface, pat dry, and sprinkle lightly with cornstarch or flour. Lay a strip of chicken across the potato and roll fairly tightly, about 2-3 times around. Cut the potato strip and secure the roll with a wooden toothpick. Repeat for all the chicken strips.
- As soon as possible, have frying oil, several inches deep, at 350F/170C. Dust the outside of the rolls with starch, then fry without crowding, until golden and crisp (about 5 minutes). Turn occasionally while frying.
- Remove to a towel-lined surface, pouring off the oil that tends to fill up the ends, and sprinkle immediately with salt. Serve at once with a wedge of lemon (or yuzu or sudachi, if you have them). Leave the toothpicks in: they serve as handles.
The whole trick is in the katsura-muki. The thinner and more even the scroll, the more perfect the crispy result. Done well, this is a tour de force. (If you want to make a bunch for a party, slow-fry at 300F until cooked, drain and keep on a wire rack, then re-fry at the last minute, at 375F or so, to crisp, color, and heat through. But it’s best straight from the fryer.)
I’m no expert, but I can pass on some katsura-muki tips from those who are:
- Feed the vegetable into the knife, not the reverse.
- The knife needs to go up and down continuously, controlled by the right hand.
- The right thumb, at the bottom of the vegetable strip on the blade, will tend to control how thick the strip is.
- The left index finger is the most important for feeding the vegetable into the knife.
Once you’ve mastered this, try it with sweet potato. Try it with pork or beef (but think about which cuts!), or even a very firm white fish like turbot.
TECHNIQUE #2: DRAW-SLICING (sogizukuri – 削ぎ造り)

Turning to the next dish:
Draw-slicing is one of the two fundamental ways of cutting raw fish, the other being what I think of as draw-cutting. Draw-cutting (hirazukuri 平造り, ordinary cutting) is done on the right side of a block of fish, such as a piece of tuna loin. Draw-slicing (sogizukuri 削ぎ造り, shave-cutting) is done on the bias at the left side of the fish. Which is most appropriate depends on the fish and the part it comes from. If in doubt, I’ll usually go with draw-slicing, but if the fish seems very thick and meaty, draw-cutting is going to work better. There are other techniques, but they’re mostly specific to particular fish.
To draw-slice, your knife blade should be at roughly a 30-degree angle to the fish’s surface, your index finger along the knife’s spine. Your left hand does almost nothing, just helping a bit to keep the fish from tearing, then picking up the slice once cut.
Start near the heel of the knife and pull. Don’t push down with the index finger: if your knife is really sharp, this isn’t necessary. Any pressure should be applied downwards, using the thumb to press the front face of the knife into the uncut block, which helps keep the slice moving smoothly. At the end of the cut, lift the handle so the knife-point shears through the last bits. If you’ve done well, the slice will lift easily onto your left hand from the knife.
RECIPE: SAWARA À LA JACQUES PÉPIN

I name this in tribute to the great Jacques Pépin, from whom I got the notion of quick-curing fish slices on a plate and then garnishing at the last minute.
Start with a fillet of Japanese Spanish mackerel (sawara). Or use any extremely fresh fish you like and think is safe to eat more or less raw. Pépin does it with salmon, but in Japan people don’t usually eat raw salmon unless it’s imported from the Atlantic. I used sawara because it’s in season and looked great at the market.
Take a plate, sprinkle with about 1 Tb each sugar and salt, and grind some pepper on top. (Note: the amount of sugar will vary a lot depending on the flavor of the fish. The bluer and fishier, the more sugar you want. Sawara is pretty fishy, so I used a generous Tb, but with a mild white fish I might skip sugar entirely.)
Draw-cut medium-thin slices of fish and lay them, not overlapping, on the plate.
Sprinkle the top with more salt and pepper—sugar is not necessary—then cover tightly with plastic wrap. Press down on the wrap to spread out the fish so it’s effectively one even layer all over the plate. Place in the refrigerator for at least half an hour—but 12 hours won’t hurt it. You can do this with individual portions and stack the wrapped plates ready to go.
At serving time, use the heel of your deba to chop some scallions very finely (or use an usuba if you have good skills and a good cutting board, or use another knife entirely if you’re a big cheater), and scatter over the fish. Also scatter some capers, freshly-toasted sesame seeds, and a small but coarse grind of pepper. Garnish the center with a pretty herb sprig. Serve at once with crusty bread or croutons.
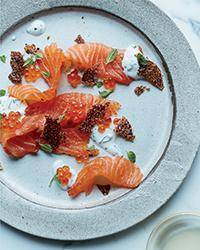
If using a mild, white fish, a drizzle of olive oil won’t hurt. A crunchy finishing salt is good if you’ve been careful about your quantities along the way. If using salmon or something similar, a dollop or two of crème fraîche will be great.
CONCLUSION
These are dishes that are easy to do… provided you have the knives and skills. They’re terrific for all occasions, and the hard work can be done ahead.
So since you’re reading this site and have some great knives, put them to work!
And as they say here in Kyoto, ōkini: thanks!